Food Photography Guide: Getting Great Food Photos in Singapore
Why Food Photography Matters for F&B Businesses
In Singapore’s hyper-competitive F&B landscape, food photography is not a luxury — it is a core business requirement. With over 14,000 F&B establishments across the island and a population that relies heavily on visual platforms like Instagram, Google Maps, and food delivery apps to decide where and what to eat, the quality of your food images directly impacts revenue.
The numbers tell a clear story. Restaurants with high-quality food photos on Google Business Profile receive significantly more direction requests and website clicks than those with amateur or no photos. On food delivery platforms like GrabFood and foodpanda, listings with professional photography see higher conversion rates — customers order from what looks appetising, not what reads well on a text menu.
Beyond direct conversions, food photography shapes brand perception. A hawker stall with beautifully shot photos positions itself differently from competitors, even if the price point is identical. A fine dining restaurant with poor food photography undermines its premium positioning before a guest walks through the door.
For F&B businesses investing in F&B marketing in Singapore, photography is the foundation. Every other marketing effort — social media, advertising, menu design, website content — depends on having strong visual assets to work with.
Food Styling Fundamentals
Food styling is the art of making food look its best for the camera. What looks great on a plate in front of you does not always photograph well, and what photographs beautifully is not always how you would serve the dish. Understanding this gap is the first step to better food photography.
Plating and Composition
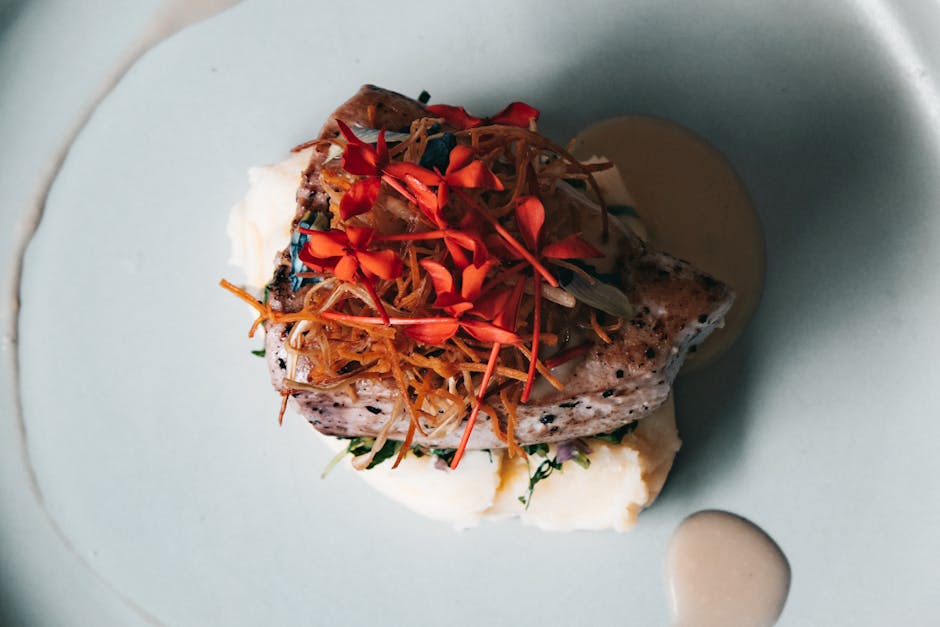
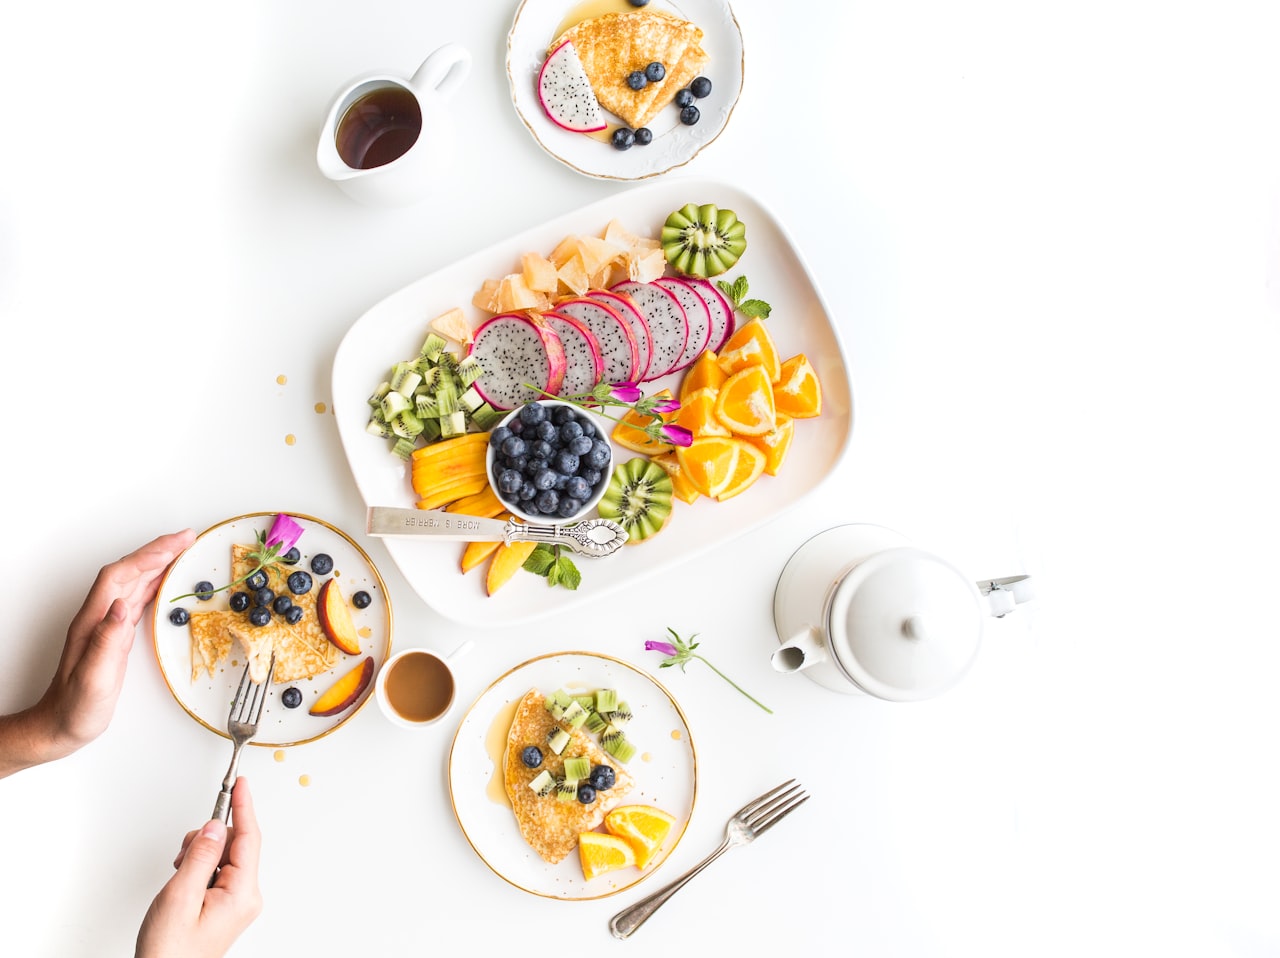
The way food is arranged on the plate matters enormously on camera. A few key principles:
- Odd numbers: Three dumplings look more visually appealing than four. Odd groupings create natural asymmetry that draws the eye
- Height and layers: Flat dishes photograph poorly. Build height by stacking elements, using sauces underneath to elevate proteins, or leaning components against each other
- Negative space: Leave room on the plate. Overcrowded plates look messy in photos, even if they communicate value to diners in person
- Colour contrast: Place colourful garnishes against neutral backgrounds. A bright red chilli on a dark laksa broth pops; the same chilli on a red curry gets lost
Garnishing for Camera
Garnishes that work in real service and garnishes that work for photography are different. Fresh herbs with visible leaves (basil, coriander, microgreens) add colour and texture. Sesame seeds, chilli flakes, and spring onion rings provide detail that cameras love. Sauces drizzled in deliberate patterns create visual movement across the plate.
For Singaporean dishes specifically, consider the visual language of local food. A bowl of bak chor mee benefits from visible vinegar and chilli drizzle. Char kway teow needs that glossy wok hei sheen. Nasi lemak components should be clearly visible and distinct — the sambal in a defined pool, the egg cleanly cut, the ikan bilis arranged rather than scattered.
Props and Backgrounds
The right props and backgrounds elevate food photography from a product shot to a story. Wooden surfaces, marble slabs, textured linen, and rustic ceramics all work well. Match the prop style to the cuisine — a sleek black plate suits modern Japanese, while a traditional ceramic bowl suits heritage Teochew porridge.
Avoid props that compete with the food for attention. The food should always be the hero. Cutlery, napkins, and ingredient elements (whole spices, raw vegetables) work as supporting props that add context without dominating the frame.
Lighting for Food Photography
Lighting makes or breaks food photography. The difference between a professional food photo and an amateur one is almost always lighting, not camera quality.
Natural Light
Natural light from a window is the most flattering light source for food. Soft, diffused daylight creates gentle shadows that add depth without harshness. In Singapore, the strong tropical sun needs diffusion — a white curtain or a sheet of translucent paper over the window softens the light dramatically.
The best natural light conditions for food photography:
- Overcast days provide naturally diffused light — ideal shooting conditions
- Morning light (7-10am) and late afternoon light (3-5pm) are softer than midday sun
- Side lighting (window to the left or right of the food) creates the most dimension
- Backlighting (window behind the food, camera in front) produces beautiful rim light on drinks and translucent dishes
- Avoid direct overhead sunlight — it creates harsh shadows and washes out colours
Artificial Light
For restaurants that need to shoot during service or in windowless kitchens, artificial lighting is necessary. A single continuous LED panel with adjustable colour temperature is the most practical investment. Set it to approximately 5500K (daylight equivalent) and position it at a 45-degree angle to the food, slightly above eye level.
A white foam board or reflector placed opposite the light source fills in shadows on the dark side of the dish. This simple two-element setup (one light, one reflector) produces professional results at minimal cost.
Common Lighting Mistakes
- Camera flash: Never use on-camera flash for food — it flattens the image and creates unflattering reflections
- Mixed lighting: Combining window light with warm restaurant lighting creates colour casts. Stick to one light source
- Overhead fluorescent: Common in commercial kitchens, fluorescent lighting adds a green tint and harsh shadows. If unavoidable, correct white balance in post-production
- Too much light: Overexposed food photos lose detail and saturation. Better to slightly underexpose and brighten in editing
Smartphone Food Photography Tips
Not every F&B business needs a professional photographer for daily content. Modern smartphones are capable of excellent food photography when used correctly. Here is how to get the most from your phone camera.
Camera Settings
- Shoot at the highest resolution available
- Lock focus and exposure by tapping and holding on the food in your camera app
- Avoid digital zoom — it degrades quality. Move closer physically instead
- Use the standard lens (1x) for most shots. The wide-angle lens distorts food, and the telephoto compresses depth unnaturally
- Turn off HDR for food photography — it can produce unnatural-looking results
Angles That Work
Three angles cover 90% of food photography needs:
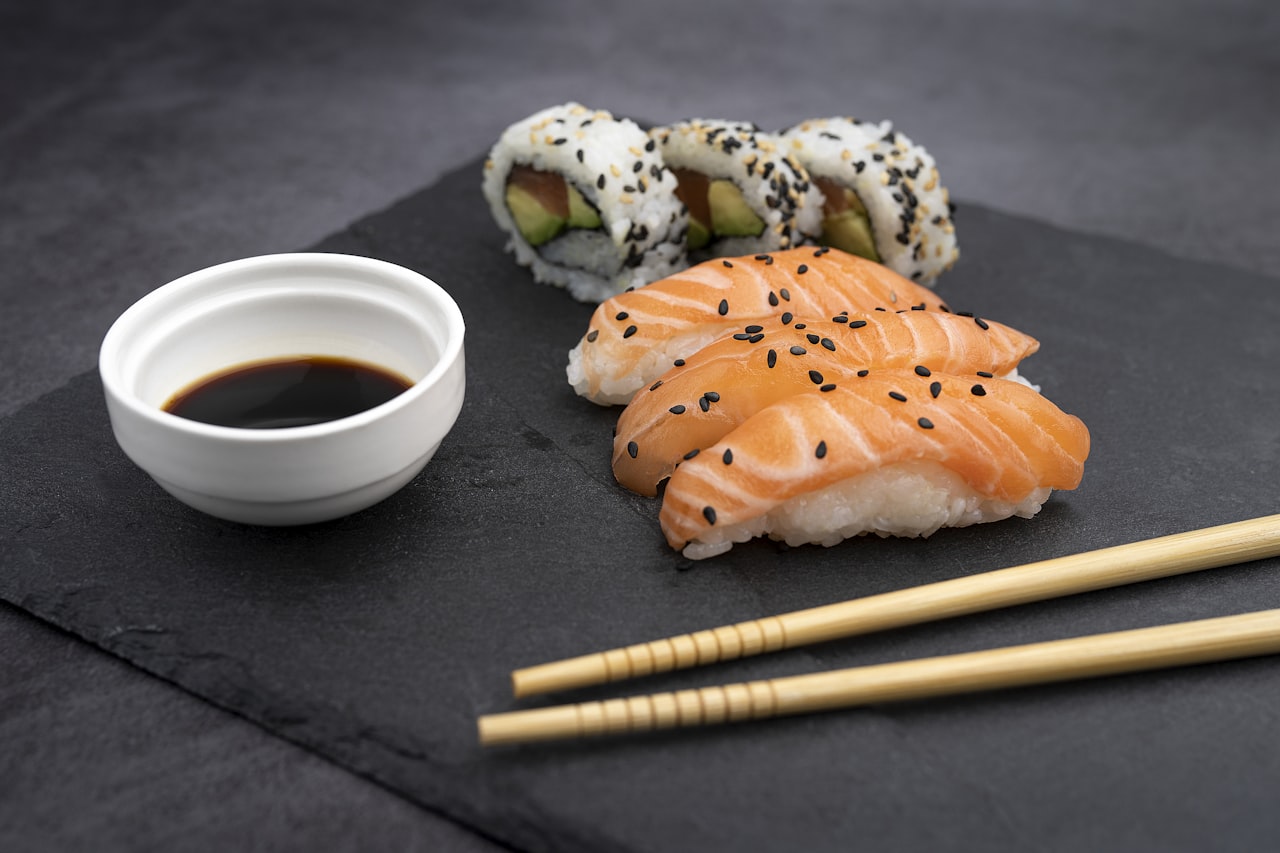
- 45-degree angle: The most natural dining perspective. Works for most dishes and shows both the top and front of the food
- Overhead (flat lay): Best for dishes with interesting top-down patterns — pizza, salads, breakfast spreads, noodle bowls. Also ideal for table spreads showing multiple dishes
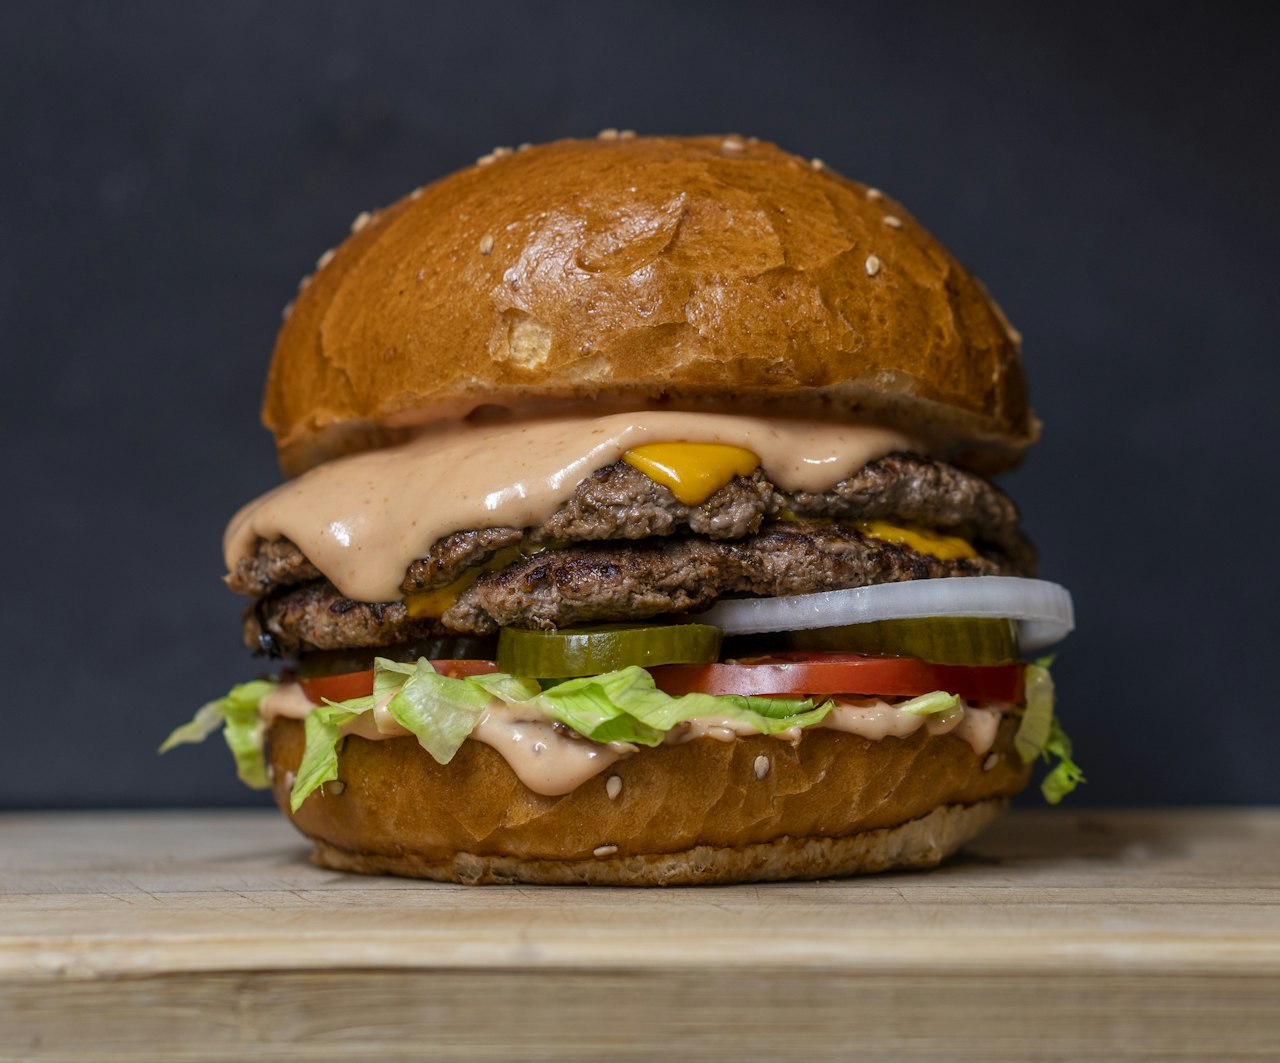
- Eye level (straight on): Best for tall dishes — burgers, layer cakes, stacked pancakes, cocktails. Shows height and layers
Editing Basics
Every food photo benefits from basic editing. Free apps like Snapseed and Lightroom Mobile cover everything you need:
- Increase warmth slightly — warm tones make food look more appetising
- Boost saturation by 5-10% — no more, or colours look artificial
- Add subtle contrast to make textures pop
- Crop to remove distracting elements at the edges
- Straighten the image — tilted food photos look careless
Consistency matters more than perfection. If all your photos share a similar editing style, your social media feed and menu look cohesive. This is especially important for Instagram marketing where grid aesthetics influence follower decisions.
Hiring a Food Photographer in Singapore
For menu shoots, marketing campaigns, and brand launches, hiring a professional food photographer is worth the investment. Here is how to find and work with the right one.
What to Look for in a Portfolio
When reviewing a photographer’s portfolio, look for:
- Consistency of style — do their photos have a recognisable look?
- Variety of cuisines — have they shot food similar to yours?
- Lighting quality — are shadows controlled and colours accurate?
- Composition — are shots well-framed with appropriate styling?
- Detail shots — can they capture texture (crispy skin, glossy sauce, steam)?
Ask for examples from actual client projects, not just personal portfolio pieces. Client work shows how they perform under real-world constraints — limited time, specific shot lists, and dishes that need to look like what customers actually receive.
The Briefing Process
A good brief saves time on shoot day and ensures the photographer delivers what you need. Your brief should include:
- The purpose of the photos (menu, social media, website, advertising)
- Mood and style references — share examples of photography you like
- A shot list with specific dishes and desired angles
- Output specifications — resolution, aspect ratios, file formats needed
- Brand guidelines if relevant — colours, styling preferences, do’s and don’ts
What to Prepare for a Shoot
Restaurant owners can significantly improve shoot outcomes by preparing properly:
- Have dishes ready to plate quickly — food degrades under lights. Ice cream melts, sauces congeal, salads wilt
- Prepare backup ingredients for re-plating if a dish does not look right on camera
- Clean all plates, glasses, and surfaces before shooting
- Have a staff member available to plate dishes consistently throughout the shoot
- Schedule the shoot during off-peak hours when the kitchen is not under service pressure
Consider whether you need a food stylist in addition to a photographer. For high-stakes shoots (brand launches, major campaigns), a stylist ensures every element is camera-ready. For regular menu updates, a skilled photographer can handle basic styling themselves. Explore food photography services to understand what a professional team provides.
Food Photography Costs in Singapore
Understanding food photography pricing in Singapore helps you budget appropriately and evaluate quotes.
Freelance Photographers
- Entry-level: $150-300 per hour or $500-1,000 per half-day session. Suitable for simple menu shots and social media content
- Mid-range: $300-500 per hour or $1,200-2,500 per half-day session. Includes styling input, professional lighting, and basic post-production
- Premium: $500-1,000+ per hour or $2,500-5,000 per half-day session. Full creative direction, advanced styling, retouching, and creative concepts
Studio Photography
Studio shoots add rental costs ($80-250 per hour depending on the studio) but offer controlled environments with professional lighting setups, backdrops, and prop collections. Some studios include basic props and surfaces in their rental fee.
What Affects Pricing
- Number of dishes: More dishes mean longer shoots. A typical photographer can shoot 8-15 dishes in a half-day session
- Styling complexity: Flat lays with multiple props and ingredients cost more than simple single-plate shots
- Post-production: Basic colour correction is usually included. Advanced retouching (removing imperfections, compositing, extensive editing) costs extra
- Usage rights: Most food photographers grant full commercial usage rights as standard. Confirm this in writing before the shoot
- Food stylist: If hired separately, food stylists charge $300-800 per half-day session
Package Deals
Many photographers offer packages for F&B clients — for example, a quarterly shoot package covering menu updates, seasonal promotions, and social media content. These packages typically offer 15-25% savings compared to booking individual sessions. For businesses also needing product photography, bundling food and product shoots with the same photographer further reduces costs.
Using Food Photos Across Marketing Channels
Getting great food photos is only half the job. Using them effectively across marketing channels determines the return on your photography investment.
Social Media
Instagram, Facebook, and TikTok are the primary platforms for food photography in Singapore. Each has its own requirements:
- Instagram Feed: Square (1:1) or portrait (4:5) crops. Consistent editing style across your grid
- Instagram Stories and Reels: Vertical (9:16) format. Behind-the-scenes prep shots and close-up detail videos perform well
- Facebook: Landscape (16:9) for link posts, square for feed posts. Album posts showing multiple dishes get higher engagement than single images
- TikTok: Vertical video, but still frames from your photo shoot can be used in slideshows and transitions
Plan your photo shoot with social media crops in mind. Shoot wider than your final frame to allow for different aspect ratio crops from the same image. For social media content ideas, food photography provides an evergreen library you can repurpose across formats and platforms.
Website and Online Menu
Your website and online menu are where food photography has the most direct commercial impact. Ensure images are high-resolution but web-optimised (compressed to under 200KB per image for page speed). Use consistent backgrounds and styling across all menu item photos for a cohesive browsing experience.
Food Delivery Platforms
GrabFood and foodpanda have specific image requirements — typically square crops with the food centred and filling the frame. Clean backgrounds without excessive props work best on delivery platforms where images appear at small sizes on mobile screens. Many delivery platforms now offer photo shoot assistance to restaurant partners, though the quality varies.
Google Business Profile
Upload your best food photos to your Google Business Profile. These images appear in Google Search, Maps, and local search results. Focus on your signature dishes and the overall dining ambience. Google’s algorithms prioritise listings with recent, high-quality photos, so update your images quarterly at minimum.
Print Materials
For physical menus, brochures, tent cards, and posters, you need high-resolution files (300 DPI minimum). Discuss print requirements with your photographer before the shoot to ensure they shoot and export at sufficient resolution. Colours can shift between screen and print — request a test print before committing to a full run.
Advertising
Paid social ads, display ads, and search ad extensions all benefit from professional food photography. Ad platforms favour high-quality images — they receive higher engagement rates, which lowers your cost per click. Create ad-specific crops during the editing process, accounting for text overlays, logo placement, and the safe zones required by each advertising platform.
Frequently Asked Questions
How often should a restaurant update its food photography?
At minimum, update your food photography whenever the menu changes. Beyond that, quarterly refreshes keep your visual content current and give you fresh material for social media and marketing campaigns. Seasonal dishes and limited-time offers should be photographed as they are introduced. If your core menu is stable, an annual comprehensive shoot with quarterly top-ups for new items and seasonal content is a practical schedule for most Singapore restaurants.
Should I hire a food photographer or use smartphone photos?
Use both. Hire a professional photographer for your core assets — menu photography, website hero images, advertising creative, and brand campaign visuals. These shots require controlled lighting, styling, and post-production that smartphones cannot replicate consistently. Use your smartphone for daily social media content — behind-the-scenes prep shots, new dish teasers, customer moments, and Stories content. The combination of polished professional photos and authentic smartphone content creates the most engaging brand presence.
What is the best time of day to photograph food in Singapore?
For natural light photography, morning (8-10am) and late afternoon (3-5pm) offer the softest, most flattering light. Midday sun in Singapore is harsh and creates strong shadows that are difficult to manage. Overcast days are ideal — the cloud cover acts as a natural diffuser. For restaurant shoots, schedule during off-peak hours (typically 2-4pm) when the kitchen is available and natural light is still usable. If shooting in a windowless space with artificial lighting, time of day becomes irrelevant.
How many dishes can be photographed in a single session?
A professional food photographer typically covers 8-15 dishes in a half-day session (3-4 hours) or 15-25 dishes in a full-day session (6-8 hours). This assumes multiple angles per dish and basic styling. Complex setups with elaborate styling, flat lays with multiple props, or dishes requiring significant preparation reduce this count. Provide your photographer with a prioritised shot list so the most important dishes are photographed first, before time pressure mounts.